

Python libraries such as NumPy and Pandas are so popular because they make engineers and data scientists productive. The first time I used NumPy, I was struck, not by its vast array of supported math functions, but by the ease with which I could manipulate arrays and matrices and, in particular, slicing rows, columns, or submatrices from large tabular datasets.

Slicing is a very fundamental operation in data science. Take, for example, a large matrix with rows representing individual customers, and columns representing customer attributes such as demographics, buying preferences, etc. To calculate basic summary statistics across specific rows you’ll need to slice specific columns and calculate the statistics. To calculate similarity measures across customer attributes (say to cluster them), you’ll need to efficiently slice rows and calculate pairwise similarity measures. You may also want to slice specific columns to remove unwanted columns from your dataset.
In this blog post, I’ll show how you can implement the NumPy style slicing feature in Mojo from scratch. Through this example, you’ll show you how to:
- Create your custom Matrix data structure that supports NumPy style slicing operations
- Use linear and strided memory access for row and column slicing
- Handle NumPy style slicing edge-cases (e.g. negative index [-2:,:] and open index [:,4])
- Implement vectorized and parallelized slicing of a submatrix
The code example I use in this blog post is available on the Mojo repository on GitHub.
Before we proceed: The purpose of this blog post is to demonstrate how to use Mojo standard library features like slicing, vectorization, parallelization, and strided memory access so you can learn how to use them in your applications. The goal is not to build a feature-complete NumPy replacement or to write the most performant Mojo code. Both of which are good exercises for the reader.
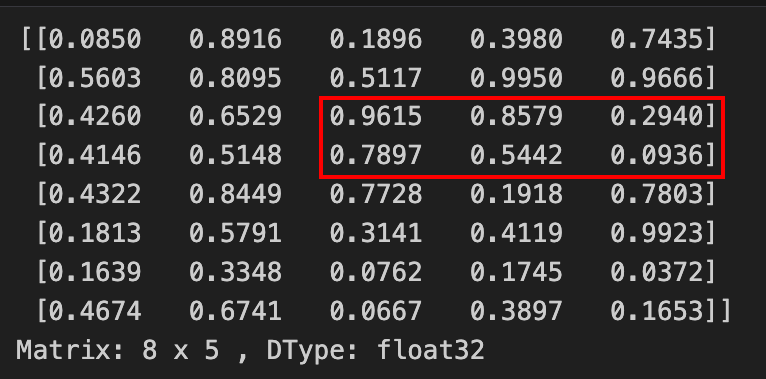
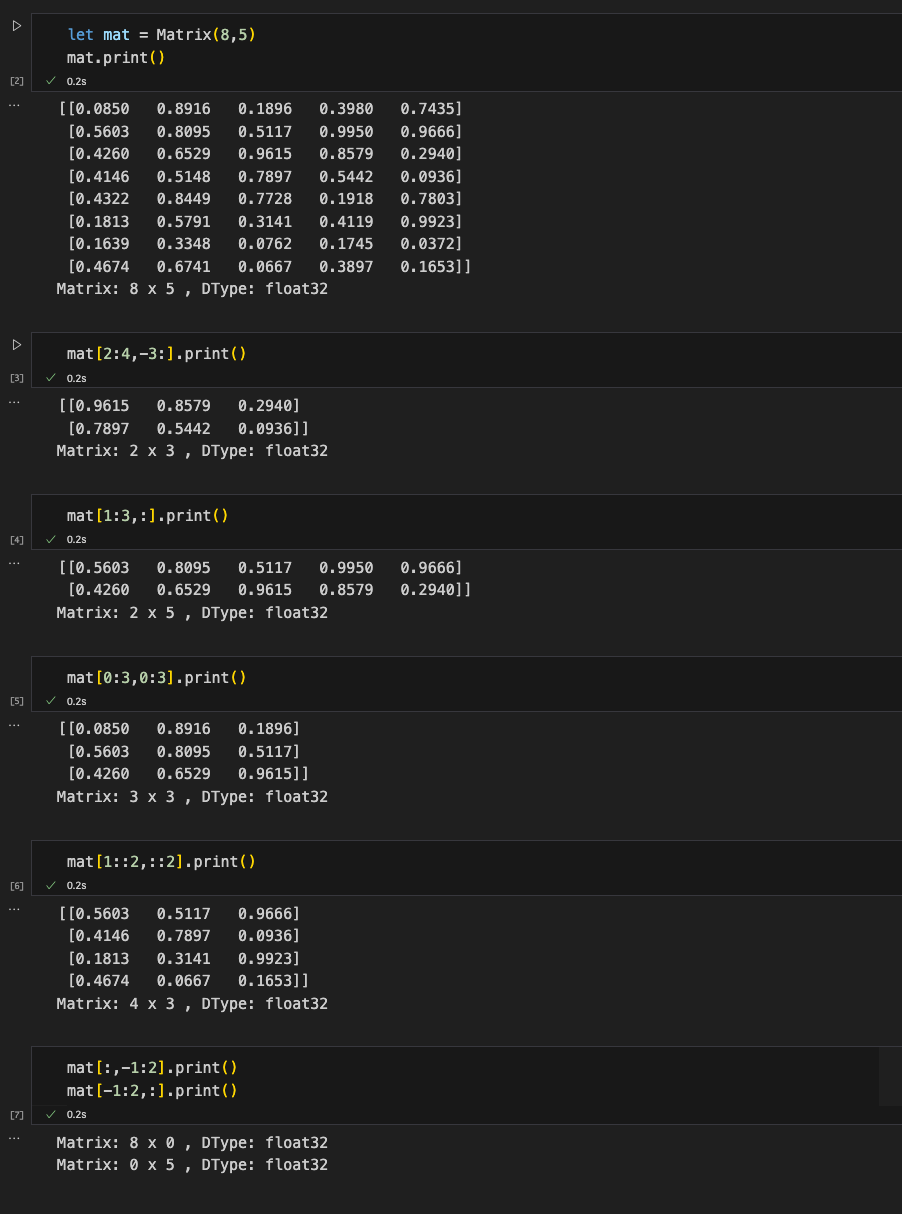
Before we jump into the implementation details, let’s take a look at our final result. We’ll build a Matrix data structure that can perform slice operations.
Output:
We can slice the matrix to extract elements at rows 2,3,4 and columns last 3 columns:
Output:
Verify that the elements in the sliced submatrix matches with the elements in original matrix
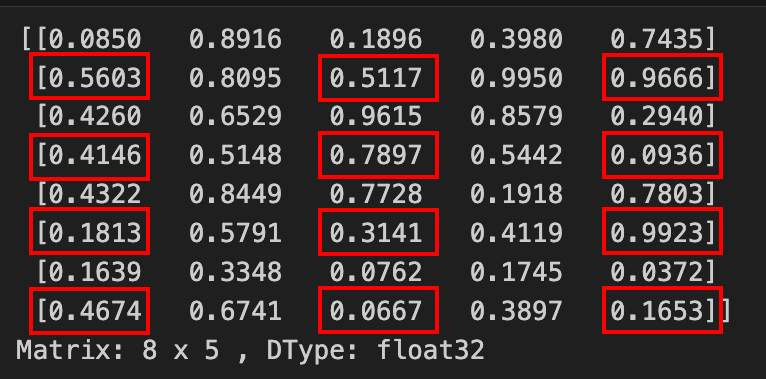
Now, let's try some advanced slicing:
Output:
Verify that the elements in the sliced submatrix matches with the elements in original matrix
Creating a custom Matrix data structure with slicing support
Let’s start with a basic Matrix struct in Mojo. A struct in Mojo is similar to a class in Python, but Mojo structs are static and compile-time bound. Our Matrix structure has the following functions:
- Initialize the Matrix: __init__()
- Enable copying the sliced matrix/vector to a new variable: __copyinit__()
- Handle slice edge cases: _adjust_slice_()
- 4 x overloaded __getitem__() method to support indexing, row-only slice, column-only slice, and combination of row and column slicing
- Convenience print() function to visualize the matrix
The skeleton of our matrix structure looks like this:
The three concepts we’ll be spending time on are:
- The struct variables that define a Matrix: Its dimensions dim0 (rows) and dim1 (columns) and its data which we allocate and access using DTypePointer
- The _adjust_slice_() function that handles slice edge cases
- The __getitem__() function that performs all the slicing magic
Adjusting slice expression to handle edge cases
In Python and in Mojo __getitem__() is a special type of function that enables indexing on an object. For example when you want to access the element at row=0 and column=3 you can do: matrix[0,3], which is equivalent to: arr.__getitem__(0,3). In our example __getitem__() is overloaded to support various combinations of indexing with integers and slices and here we’ll discuss the following __getitem__() that supports slice variables
The has two arguments row_slice and col_slice of type slice. When you use a slice expression such as [:,3:4], a slice object is generated and passed to __getitem__() which is why we have row_slice and col_slice variables with type slice. The slice object lets you access the requested slice items and the length of the slice, but it doesn’t handle edge cases. If the slice expression has negative numbers or exceeds the number of rows or columns in the matrix, we have to adjust the slice to handle those cases. This is what the _adjust_slice_() function does and is the first function we call on the row_slice and col_slice variables.
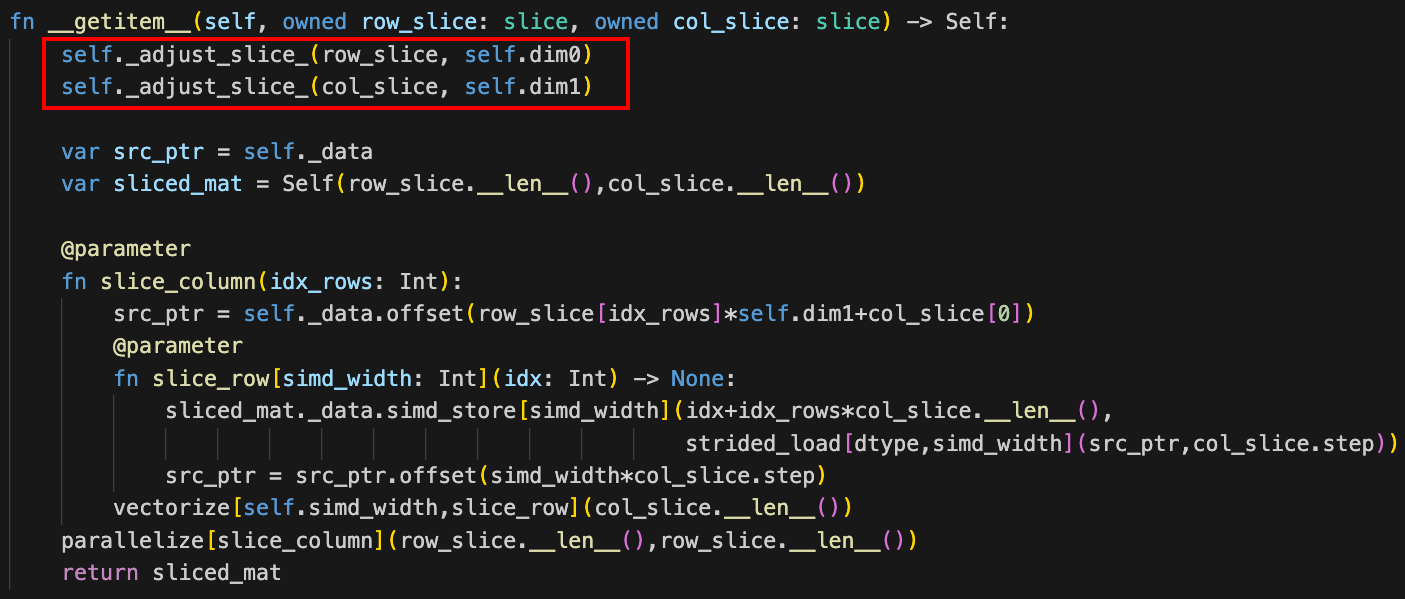
Here's a screenshot of __getitem__() highlighting the calls to _adjust_slice_() functions to handle slice edge cases:
Let’s take a closer look at _adjust_slice_()
The _adjust_slice_() function supports row and column slice adjustments and works as follows. We check
- If the start is negative and we subtract it from the dimension size
- If the slice expression has no end, i.e. uses : and we assign an end
- If the end is negative, subtract it from the dimension size
- If the end exceeds the dimension size, fix it to the dimension size
- If the end is less than the start, make the slice invalid
After we adjust for the slice, we’re ready to start slicing the matrix.
Slicing rows and columns with linear and strided memory access
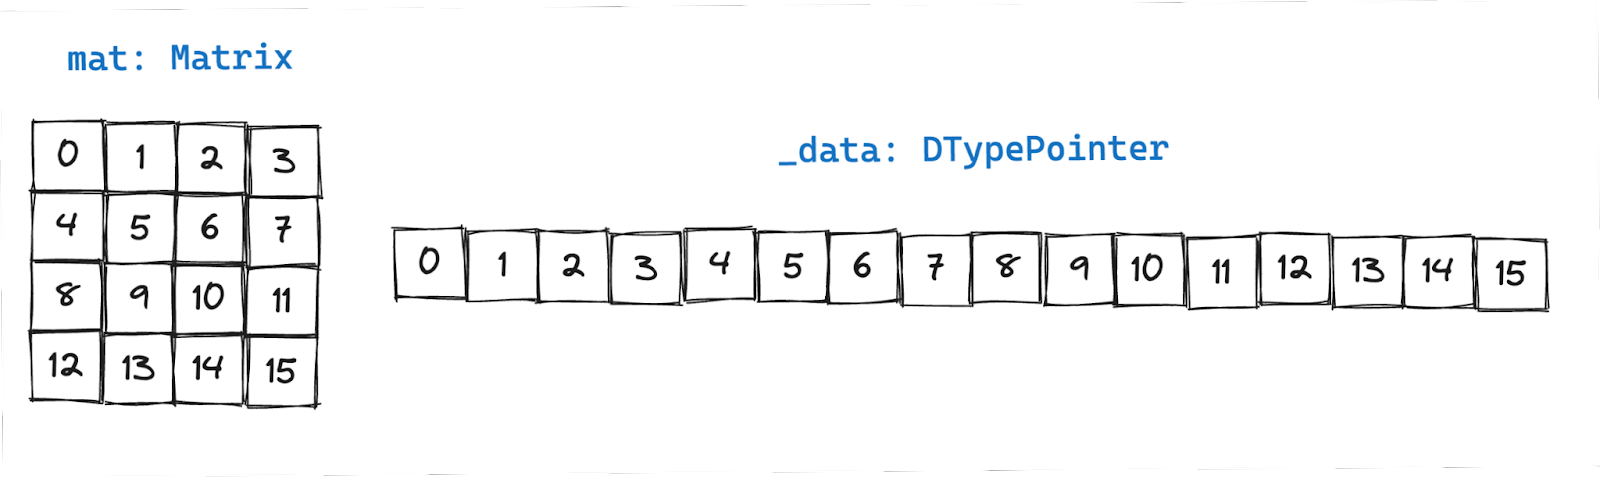
First, let’s go over our memory access strategy. Matrix struct includes the raw data stored in memory and accessible using the pointer _data, and it includes dimension information stored in variables dim0 for row dimension and dim1 for column dimension. Together they contain the complete information to describe a matrix.
Accessing all elements in a row
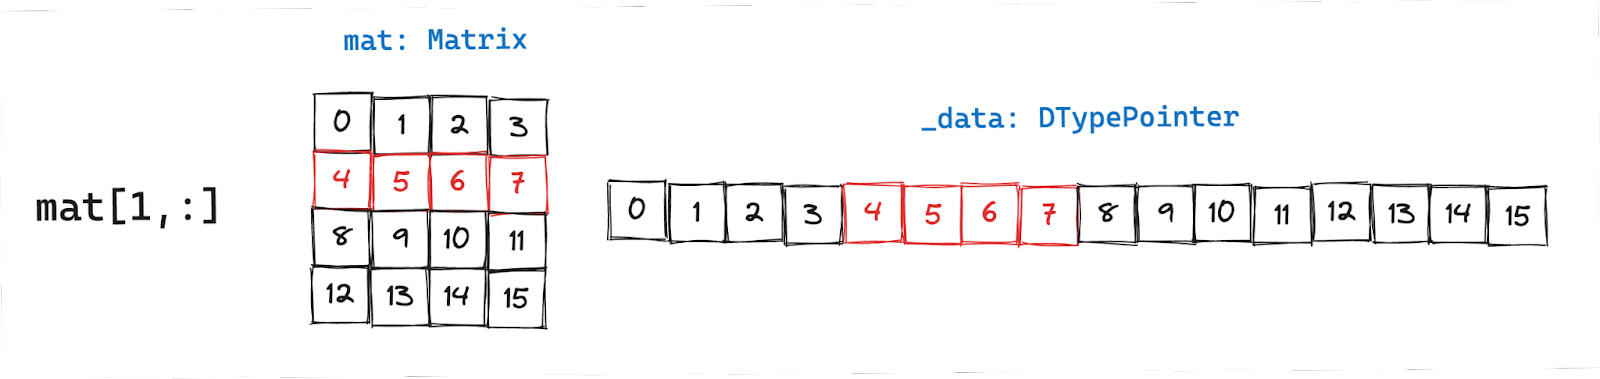
Row access is relatively straightforward. We get the pointer to the first element defined by (row number to slice) * (number of columns). The following line of code gets you the pointer to the first element:

Once you have the pointer to the data and know the number of elements to load (=number of columns in the matrix), you can use _data.simd_load to load simd_width chunks of data. Things get a little more involved when you want to load non-sequential data as we’ll see next.
Accessing all elements in a column
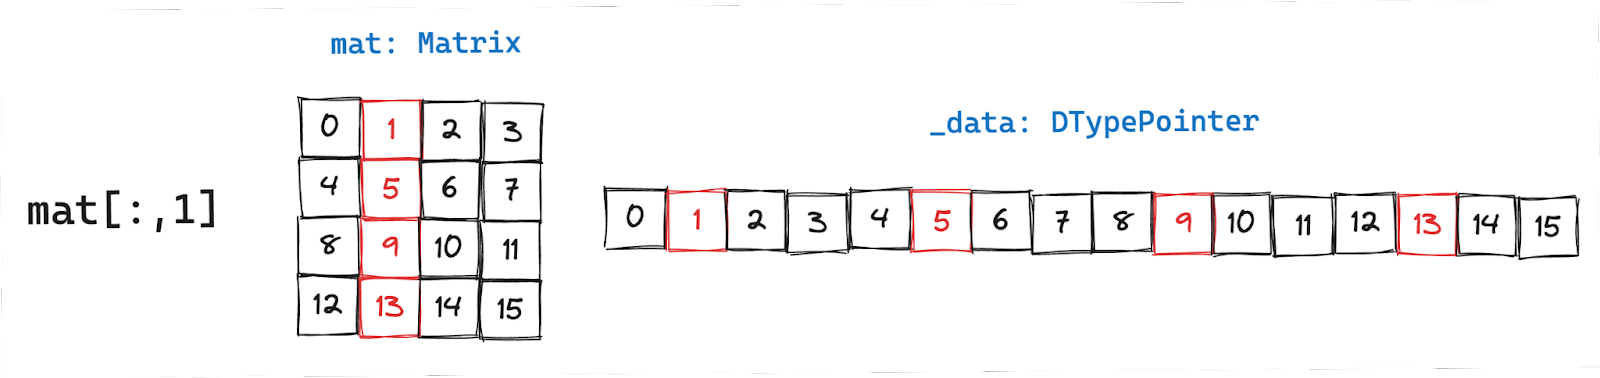
Column data are not stored sequentially in memory, but they are spaced equally apart. Just like before, we’ll get the pointer to the first element:

The spacing between each element in the column is also called stride length and is equal to the number of columns in the above example. To load data in strided fashion you can use strided_load(src_ptr, stride).
Accessing arbitrary row and column slice
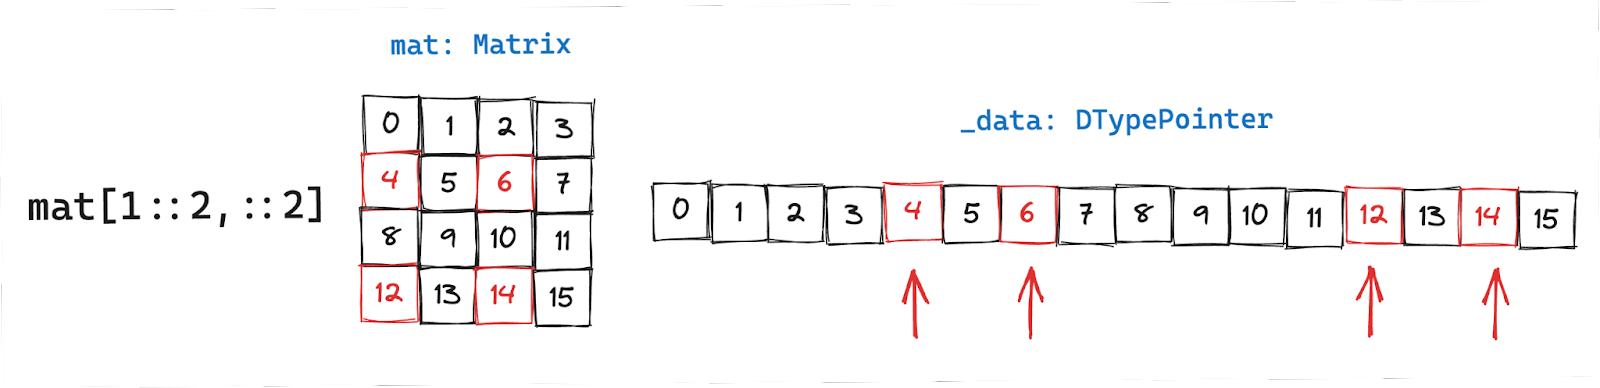
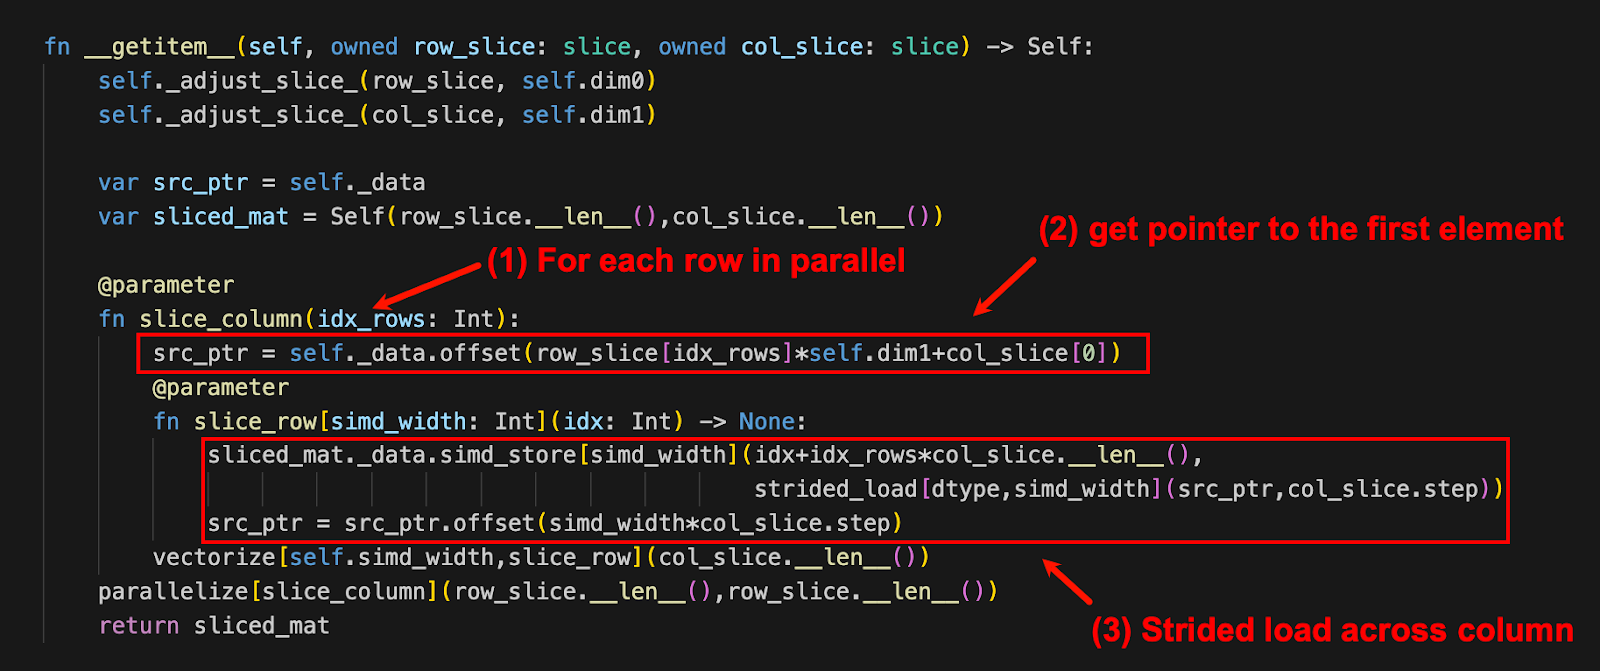
Now, things start to get more interesting. Here we have a combination of row and column slices: [1::2,::2]. For each row we have to:
- Get the pointer to the first element
- Get the data using strided_load with column slice as the stride length
In the above example, to access the elements: [[4,6][12,14]] we follow the two steps, as I’ve also illustrated below:
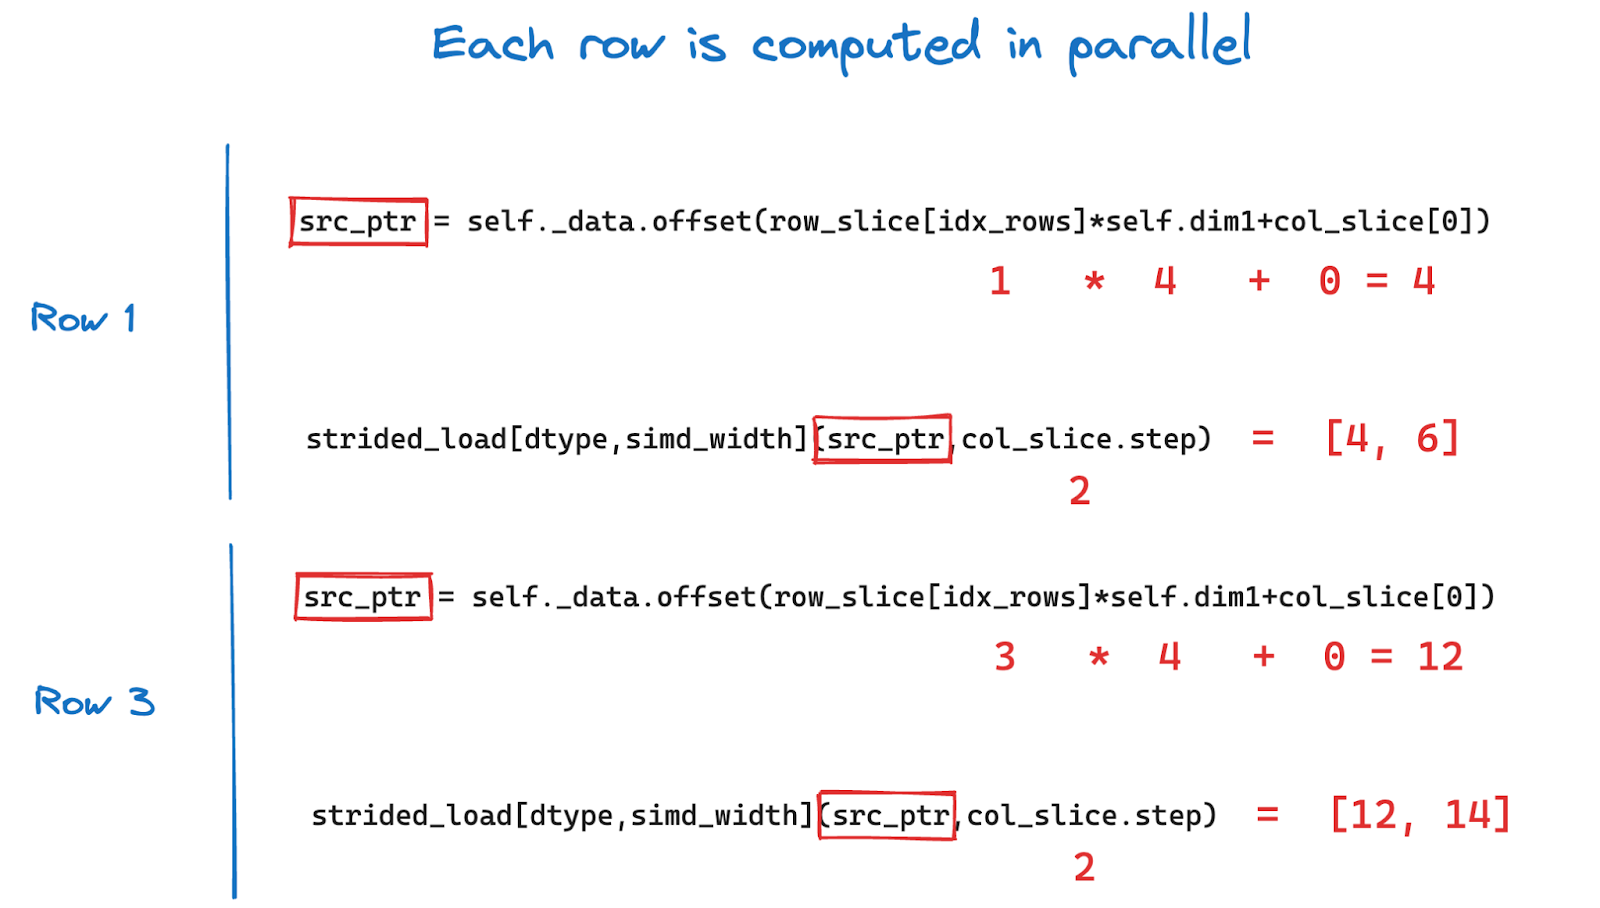
Since each row can be computed independently we can parallelize across rows to get speedup!
All of this comes together in the __getitem__() function, as you can see with annotations below:
Now it’s your turn!
Head over to GitHub to access the Jupyter Notebooks with the Matrix implementation we discussed in this blog post and test it with different matrix sizes and extend it for your application.
Conclusion
One of the benefits of using Mojo is that it doesn’t suffer from the two language problem. Most high-performance Python libraries are thin Python wrappers over complex C and C++ implementations and NumPy is no exception. This makes understanding what's under the hood difficult for a Python programmer, and harder to extend if you are not familiar with both languages. Mojo looks and reads like Python and offers lower-level features to manage memory, add types etc. You don’t have to use two separate languages to write performant code, you can do it all in Mojo! I hope you enjoyed this walkthrough, all the code shared in this blog post is available as a Jupyter Notebook on GitHub.

Don't forget to register for Modular’s first-ever annual conference, ModCon, happening on Dec 4th in San Francisco. Register now if you want to meet the team in person, get access to workshops and panels, epic swag, and even more surprises! We're also taking Mojo project submissions for ModCon Contest where you could win prizes and be invited to present on stage! Submit now!
Until next time! 🔥


